The following is a general recommendation on steps that can be taken to apply Graphic Films self-adhesive products.
Many of the points highlighted have proven to supply trouble free performance after the application is undertaken.
TEMPERATURE
The application surface and surrounding atmosphere should be 50° F or above for best results. If applications are to be made under 50°F, the application surface should be cleaned with isopropyi alcohol to insure good initial adhesion.
CLEANING
In general, the first step in application is to remove any grease, wax, oily substance, oil and/or dirt before applying the film. Normal dirt may be removed with a standard commercial detergent solution or mild soap. Cleaners such as "409" or "Fantastik" can also be used. Oil, grease, or oil substances should be removed by a solvent wipe using tuluol, lacquer thinner, xylol, mineral spirits or cychexanone. After cleaning, the application surface should then be rinsed with clean, warm water and dried with a clean, lint free cloth.
Experience has proven the pressure sensitive adhesive films to be durable and lasting when applied to properly prepared surfaces. Excellent adhesion can be obtained on surfaces such as glass, hardboard, plywood, lacquer, painted enamel, steel, aluminum, and many kinds of plastic.
Some unpainted aluminum extrusions have a surface contamination, which must be removed prior to application. Uncoated and unetched aluminum surfaces should be etched and degreased. For prefetched, anodized surfaces, a solvent wipe is required. Unpainted aluminum vehicle bodies can either be steam cleaned or detergent and water washed with a following water rinse. Either method requires a subsequent solvent wipe.
Unpainted chrome, stainless steel or chrome plating should be solvent wiped. Painted enamel should be allowed to dry sufficiently. For most air-drying paints, one week is acceptable. While all long alkyd enamels are slow to dry, baked enamels on the other hand can be used immediately after cooling.
Special attention should be given to lacquer thinner, Naphtha, and VMP and Xylol solvent wiping, as these solvents may dull some painted surfaces.
Lacquered surfaces may be cleaned with mineral spirits or heptane.
1. Buff application surface with solvent saturated steel wool.
2. Wipe surface clean with clean cloth.
3. Allow area to air dry for a minimum for eight (8) hours.
4. Seal wood edges.
Surface preparation of high-density plywood for general use or sign grade only, should be as follows:
· Only tempered or fused hardboard - that is, smooth on both sides - should be used. It should be wiped with a clean dry cloth and then primed and painted on both surfaces and all edges.
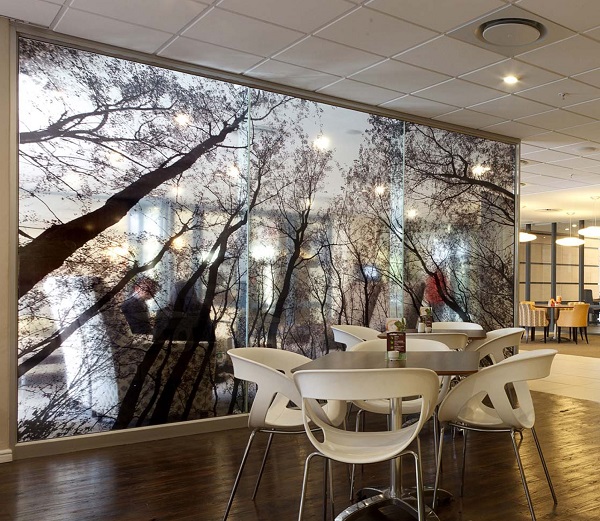
· Clear, non-tinted glass should be solvent wiped. Due to temperature stress factors, it is recommended that markings be applied on the outside or not exceed 10% of the glass surface area on the inside applications.
· Plastics, as a group, vary so greatly in composition, type and manufacture that a general recommendation cannot be given as to adhesive type. Many plastics contain release agents, plasticizers and other migratory components, which contaminate the adhesive, resulting in premature failure. All plastic surfaces should be carefully tested for outgassing prior to application. Successful applications have been made to even troublesome surfaces such as nylon and polyethylene. Acrylic and flame treated polyethylene may be cleaned with a solvent wipe. Some plastics such as polycarbonates, are best cleaned with isopropyi alcohol.
APPLICATION METHODS
When using a plastic squeegee to apply a film to an application surface, it may be wise to wrap the squeegee in several layers of soft cloth to avoid hairline scratches on the film and/or application surfaces.
A. Dry Method - Decals 12" x 12" or smaller
Materials: 1) Squeegee or stiff cardboard or clean cloth. 2) Pin or needle. 3) Proper cleaning material
1. Clean and dry the application surface.
2. Mark the desired decal position.
3. Keeping fingers away from the adhesive, peel backing paper approximately 1" from the top of the decal. Fold down and crease the backing paper.
4. Align and apply the decal starting at the top. Remove the backing paper a little bit at a time, and squeegee as you go. Use firm, overlapping strokes with the squeegee, stiff cardboard or clean cloth.
5. If air bubbles occur, puncture with a pin or needle and smooth down with the squeegee. If air bubbles are not removed completely, adhesive will turn white from air entrapment.
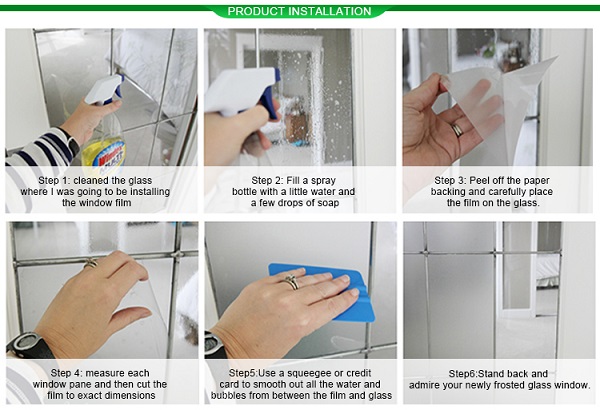
B. Wet method - Decals over 12" x 12" or smaller decals or intricately die cut shapes. This method is useful in hot weather because it minimizes the chance of the decal tearing and pre-adhesion. (Not to be used for applying film to aircraft).
Materials: 1) Squeegee 2) Sponge 3) One (1) gallon cold water in a bucket 4) Liquid soap 5) Clean cloth 6) Pin or needle 7) Scissors 8) Proper cleaning material
1. Clean and dry the application surface.
2. Mark the desired decal position. If application surface carries hinges, hardware or door openings cut the decal and apply in smaller sections.
3. Prepare a wetting solution of 3 or 4 drops of liquid soap, in one (1) gallon of cold water.
4. Use a spray bottle with the wetting solution to wet the surface area of the glass. Note: do not spray the adhesive side of the graphic directly.
5. Remove decal liner and apply decal to the wet glass area. Slide the decal to align properly.
6. Position the decal and squeegee flat from top to bottom with light, overlapping stokes from the center outward toward each edge.
7. Dry the entire area with a clean cloth and re-squeegee the decal with firm stokes, working away from the center outward toward each edge.
8. Allow to dry for twenty-four (24) hours and re-squeegee.
9. If air / water bubbles occur, puncture with a pin or needle and smooth down with squeegee.
10. If water bubbles are not removed completely, the adhesive will absorb the water left underneath the graphic and it will turn white in spots. If this occurs, remove the excess water using a pin or needle and squeegee down. The white color will go away in 2-3 days. Do not try to speed up the drying process by using heat. (Ultimate adhesion will occur 24 - 48 hour after application)
C. Striping - Follow the same procedure as in the dry method, but pull off the backing a foot or so, and make sure all edges are firmly adhered.
EDGE SEALING
Sealing the edges of the decal will provide maximum durability under difficult exposure conditions. Edge sealing is always recommended where severe exposure to gasoline and low molecular weight oils are to be encountered. A varnish type formulation or clear top coating formulation recommended by the supplier of the particular decal ink being used may be applied around the edges of the decal with a small brush or felt wick applicator.
REMOVAL
The decal can be removed by inserting a sharp knife or razor under a corner of the decal and peeling the film very carefully. The decal may not peel completely, but should remove in fairly decent size strips. Any residual adhesive that might transfer to the application surface can be removed by picking with the pressure-sensitive side of the removed label. If this proves unsuccessful, a mild solvent may be used or prolonged soaking in solvents such as toluol or xylol may be performed. (Check with paint dealer to be sure the solvent does not attack the surface.)